Difference between revisions of "Exposure meter"
(→Photoelectric cells: expanded section) |
|||
| (73 intermediate revisions by 18 users not shown) | |||
| Line 1: | Line 1: | ||
| + | {{glossary}} | ||
| + | {{Flickr_image | ||
| + | |image_source= http://www.flickr.com/photos/phollectormo/5539013627 | ||
| + | |image= http://farm6.staticflickr.com/5058/5539013627_7e09766ab4.jpg | ||
| + | |image_align= right | ||
| + | |image_text= Meters | ||
| + | |image_by= phollectormo | ||
| + | |image_rights= wp | ||
| + | }} | ||
| + | |||
| + | At best, photographic film or digital sensors are only able to record a range of scene brightness of roughly 1000:1 (10 stops)—significantly poorer than human vision. Thus, a camera's exposure settings must be adjusted so that no significant highlight or shadow detail falls outside the range that can be recorded. | ||
| + | |||
| + | An '''exposure meter''' (short form ''meter'', commonly '''light meter''') is an instrument that measures light and can calculate exposure settings, taking account of film or sensor sensitivity (ASA/DIN). | ||
| + | |||
| + | Whilst the two terms "light meter" and "exposure meter" are often used interchangeably, there is a difference: | ||
| + | *Light meters display lux or footcandles and are used to measure absolute light intensity, such as assessing proper lighting levels in a work environment (photometry or photometric reading). Measurement is always incident using a flat diffuser to measure only the source light. | ||
| + | *Exposure meters have, in addition, a calculator to display computed exposure settings for a camera, taking film / sensor sensitivity into account. Measurement can be reflected, or incident using a domed diffuser which also takes account of reflected light. | ||
| + | |||
| + | Some professional meters can make both types of measurement. | ||
| + | |||
| + | ==Incident & reflected measurement== | ||
| + | Built in camera meters always measure reflected light, with variations due to reflectivity of the subject, which is why exposure compensation is provided. Hand held meters may also measure incident light (i.e. source light) using a translucent dome, which eliminates variations due to the subject. Taking a reflected reading from an 18% grey card is equivalent to an incident reading. | ||
| + | |||
| + | For reversal (slide) film or electronic cameras incident light measurement is usually preferred since final image intensity depends only on the captured intensity. | ||
| + | |||
| + | For negative film, reflected measurement is often preferred since final image intensity can be adjusted in the enlargement process. By using reflected measurement, especially the zone system<REF>[http://en.wikipedia.org/wiki/Zone_System "Zone System"] article at [http://en.wikipedia.org/wiki/Main_Page Wikipedia].</REF>, a greater range of shadow to highlight detail may be recorded. | ||
| + | |||
| + | In a photographic studio incident readings will usually be used since the contrast range is carefully controlled. | ||
| + | |||
| + | ==Photoelectric cells== | ||
| + | In the 1930s photoelectric systems were made practical in size and cost, and revolutionized photography. Rhamstine and Weston introduced a meter based on Selenium cells. Like a small solar panel, [[selenium]] cells are generate a small amount of electricity when exposed to light that can be measured and is repeatable. These were the most common early type of photoelectric light meter, from handhelds to in-camera (coupled and uncoupled) but require a relatively large surface to be sensitive. Multiple "insect eye" lenses covering the photocell are very characteristic of a [[selenium meter]]. | ||
| + | |||
| + | Later, more sensitive electronics were introduced with smaller size, better sensitivity and longer life. These are photo-resistor types, i.e. resistance decreases when exposed to light and require the use of batteries in the exposure meter. | ||
| + | Initially Cadmium Sulfide or Selenide ([[CdS]]) photo resistors were used, that were replaced by [[Silicon]] photodiodes (PD, or SBC; 'silicon blue cell'). The small size of these sensors allowed the development of [[TTL]] exposure metering . [[Silicon|SBC]] sensors respond quickly enough to evaluate flash intensity and can measure very small amounts of light. [[Selenium meter]]s have not disappeared entirely as they are the only type not requiring a battery. | ||
| + | |||
| + | ==Meter types== | ||
| + | ===Mechanical scale=== | ||
| + | Mechanical scale (analog) meters usually have a large and distinctive circular scale, however some have a linear scale. This scale must first be aligned to the measured illuminance, but then the entire range of exposure settings can be read off. | ||
| + | |||
| + | The meter display can be the classic moving pointer, which may have a follow pointer to align the exposure scale. Null or zero pointer meters are aligned to a central "null" position (e.g. [[Gossen Profisix]]). A few electronic meters use an LED array for scale alignment. | ||
| + | |||
| + | ===Digital=== | ||
| + | Digital meters do not have any mechanical component and display exposure settings digitally. A computed exposure setting is displayed immediately, however only one setting can be shown at a time and up / down buttons are provided to scroll through the range of settings. | ||
| + | |||
| + | Many digital meters also display an analog like scale of the aperture setting to the nearest half stop. | ||
| + | |||
| + | == Early exposure meters == | ||
| + | ===Actinometers=== | ||
{{Flickr_image | {{Flickr_image | ||
| − | |image_source= http://www.flickr.com/photos/ | + | |image_source= http://www.flickr.com/photos/29504544@N08/48651949687/in/pool-camerawiki/ |
| − | |image= http://static.flickr.com/ | + | |image= https://live.staticflickr.com/65535/48651949687_d64c23af4c_m.jpg |
| + | |image_align= right | ||
| + | |image_text= Haka Expometer c.1910 | ||
| + | |image_by= Hans Kerensky | ||
| + | |image_rights= with permission | ||
| + | }} | ||
| + | ''[[Actinometry|Actinometers]]'' were the first exposure meters. They typically had the shape of a pocket watch and used light sensitive photo print paper as means of measuring. The time to darken a piece of such paper until it matches a standard tint is the input value for the scales on which an appropriate shutter-speed/aperture combination for the light situation can be found. | ||
| + | {{br}} | ||
| + | ===Extinction meters=== | ||
| + | {{Flickr_image | ||
| + | |image_source= http://www.flickr.com/photos/89864432@N00/4178486955/in/pool-camerawiki | ||
| + | |image= http://farm3.static.flickr.com/2785/4178486955_febab71d8a_m.jpg | ||
|image_align= left | |image_align= left | ||
| − | |image_text= | + | |image_text= Logaphot extinction meter of 1955<br/>with slide-rule back to determine<br/>exposure settings for 100 [[film speed|ASA]] |
| + | |image_by= Uwe Kulick | ||
| + | |image_rights= with permission | ||
}} | }} | ||
| + | Another early meter, the ''extinction meter'', depends on eyesight: the user looks through the meter at a row of numbers, each behind a celluloid window of different opacity, the highest or lowest visible number determining which light situation is given. Other extinction meters have a pattern visible through the eyepiece, and a control varies the amount of light allowed into the device until the pattern can only just be seen; the position on the control then indicates the exposure. | ||
| + | {{Flickr_image | ||
| + | |image_source= http://www.flickr.com/photos/captkodak/271891485/in/pool-camerawiki | ||
| + | |image= http://farm1.static.flickr.com/106/271891485_cf66c25f63_m.jpg | ||
| + | |image_align= right | ||
| + | |image_text= Mimosa extinction meter of 1947 | ||
| + | |image_by= Steve Harwood | ||
| + | |image_rights= non-commercial | ||
| + | }}{{br}} | ||
| − | + | == Exposure meter makers == | |
| + | {{Flickr_image | ||
| + | |image_source= http://www.flickr.com/photos/captkodak/271837535/in/pool-camerawiki | ||
| + | |image= http://farm1.static.flickr.com/107/271837535_9989e5f4f2_m.jpg | ||
| + | |image_align= right | ||
| + | |image_text= Bertram Chrostar Exposure Meter | ||
| + | |image_by=Steve Harwood | ||
| + | |image_rights=nc | ||
| + | }} | ||
| + | * [[AVO]] | ||
| + | * [[Bewi|Ernst & Wilhelm Bertram (Bewi)]] | ||
| + | * [[General Electric]] | ||
| + | * [[Gossen]] | ||
| + | * [[Kobayashi Seiki]] (Kopil) | ||
| + | * Lux | ||
| + | * [[Minolta]] | ||
| + | * [[Samoca light meters|Samoca]] | ||
| + | * [[Sedic]] | ||
| + | * [[Sekonic]] | ||
| + | * [[Soligor]] | ||
| + | * [[Vibrator]] | ||
| + | * [[Vivitar#Light_Meters|Vivitar]] | ||
| + | *[[Weigand|Weigand Messtechnik]] | ||
| + | * [[Weston]] | ||
| + | * [[Zeiss Ikon]] | ||
| + | |||
| + | and many others; see [[:Category: Meter makers]]. | ||
| + | |||
| + | == Exposure meters in cameras == | ||
| + | The first camera to include a built-in meter was the 1935 Zeiss Ikon [[Contaflex (TLR)]], using a [[selenium]] cell. To give sufficient sensitivity, a selenium cell requires a certain surface area (roughly postage-stamp sized). When covered with "insect eye" lenses to give directivity, they dominated the appearance of many mid-century cameras. In the early 1960s, makers of cameras and light meters adopted the battery-powered [[CdS]] photoresistor as a sensor element, which could be much more compact. Finally, gallium arsenide and silicon photodiodes were adopted, for their faster response rate. | ||
| − | + | The earliest built-in meters had no coupling to the camera's shutter or aperture settings. The photographer was expected to set both manually, based on the reading given. Later meters were "semi-coupled": meter readings were adjusted according to one of the camera's settings, and the readout indicated how the user should set the other. Finally, both aperture and shutter speed settings were coupled | |
| − | + | ====Meter limitations and workarounds==== | |
| + | A hand-held meter may be brought very close to a subject, or used to measure the light falling onto it, for a very accurate reading. A meter viewing light from the entire scene may give incorrect exposure, the most common problems being bright background behind the subject, such as a bright sky, or bright light reflecting off snow, sand, or water, leading to underexposure of the desired subject. Less commonly, dark backgrounds can also give incorrect readings. | ||
| + | |||
| + | Built-in meters may use a metering pattern strongly weighted towards the center of the frame (or even just a small spot). Camera makers have added increasingly complicated multi-zone metering, designed to identify typical "tricky light" situations and compensate accordingly. | ||
| + | |||
| + | For manual exposures, a solution is to walk closer to the main subject or zoom in with the lens, take a meter reading, and then recompose. The correct exposure value can also be read off a mid-toned 18-percent gray card held in front of the subject (or even the palm of the hand, then adjusting upwards by 1 stop). Like using an incident meter, this ensures that the light falling on the subject is measured, rather than the variable amounts reflected back towards the camera by a white wedding dress or a black cat. | ||
| + | |||
| + | Many advanced cameras with autoexposure offer of Auto Exposure Lock (AE Lock, Exposure Memory Lock, or EV Lock). Using AEL, it's possible to selectively take a meter reading of the desired area of the subject (for instance the bride's face). With that value now locked in, the complete scene can be photographed at the locked exposure. | ||
| + | |||
| + | As well, the technique of exposure bracketing can be used. Bracketing ([[Exposure|Exposure & Exposure Bracketing]]) is the technique of taking multiple photos at different exposures to ensure at least one of them will be correctly exposed. | ||
| + | |||
| + | == Professional Meters == | ||
| + | Certain types of light meters are typical professional photographic tools: | ||
| + | * [[Spot meter]]s | ||
| + | * [[Flash meter]]s | ||
| + | |||
| + | ==Notes== | ||
| + | <references/> | ||
| + | |||
| + | == Links == | ||
| + | * [http://www.jollinger.com/photo/meters/other/invention.html "Who Invented the Modern Exposure Meter?"] by [http://www.jollinger.com/photo/meters/index.html James Ollinger] | ||
| + | * [http://www.butkus.org/chinon/flashes_meters.htm PDF of Light meter instruction manuals (various makes and models)] www.orphancameras.com | ||
| + | * [http://www.photo-manuals.com/manual/sekonic/light-meter Sekonic Light Meter Manuals : Photo-Manuals.com] | ||
| + | * [http://www.jollinger.com/photo/meters/index.html James's Light Meter collection] contains images, reviews and instructions for a large number of vintage meters. | ||
| + | * [http://lightmetermuseum.com/Light%20meters/index.html Anssi's collection] | ||
| + | |||
| + | [[Category: meters|*]] | ||
| + | [[Category: Camera parts]] | ||
| + | [[Category: Accessories]] | ||
Latest revision as of 12:27, 14 April 2024
|
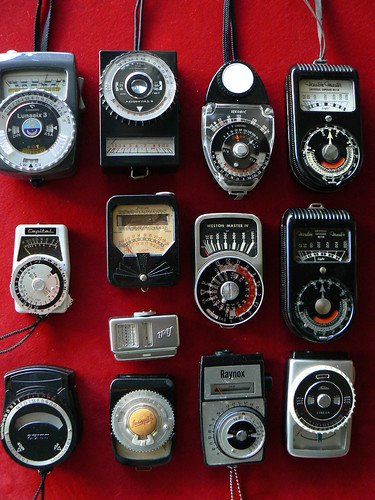
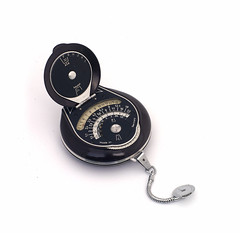
| Meters image by phollectormo (Image rights) |
At best, photographic film or digital sensors are only able to record a range of scene brightness of roughly 1000:1 (10 stops)—significantly poorer than human vision. Thus, a camera's exposure settings must be adjusted so that no significant highlight or shadow detail falls outside the range that can be recorded.
An exposure meter (short form meter, commonly light meter) is an instrument that measures light and can calculate exposure settings, taking account of film or sensor sensitivity (ASA/DIN).
Whilst the two terms "light meter" and "exposure meter" are often used interchangeably, there is a difference:
- Light meters display lux or footcandles and are used to measure absolute light intensity, such as assessing proper lighting levels in a work environment (photometry or photometric reading). Measurement is always incident using a flat diffuser to measure only the source light.
- Exposure meters have, in addition, a calculator to display computed exposure settings for a camera, taking film / sensor sensitivity into account. Measurement can be reflected, or incident using a domed diffuser which also takes account of reflected light.
Some professional meters can make both types of measurement.
Contents
Incident & reflected measurement
Built in camera meters always measure reflected light, with variations due to reflectivity of the subject, which is why exposure compensation is provided. Hand held meters may also measure incident light (i.e. source light) using a translucent dome, which eliminates variations due to the subject. Taking a reflected reading from an 18% grey card is equivalent to an incident reading.
For reversal (slide) film or electronic cameras incident light measurement is usually preferred since final image intensity depends only on the captured intensity.
For negative film, reflected measurement is often preferred since final image intensity can be adjusted in the enlargement process. By using reflected measurement, especially the zone system[1], a greater range of shadow to highlight detail may be recorded.
In a photographic studio incident readings will usually be used since the contrast range is carefully controlled.
Photoelectric cells
In the 1930s photoelectric systems were made practical in size and cost, and revolutionized photography. Rhamstine and Weston introduced a meter based on Selenium cells. Like a small solar panel, selenium cells are generate a small amount of electricity when exposed to light that can be measured and is repeatable. These were the most common early type of photoelectric light meter, from handhelds to in-camera (coupled and uncoupled) but require a relatively large surface to be sensitive. Multiple "insect eye" lenses covering the photocell are very characteristic of a selenium meter.
Later, more sensitive electronics were introduced with smaller size, better sensitivity and longer life. These are photo-resistor types, i.e. resistance decreases when exposed to light and require the use of batteries in the exposure meter. Initially Cadmium Sulfide or Selenide (CdS) photo resistors were used, that were replaced by Silicon photodiodes (PD, or SBC; 'silicon blue cell'). The small size of these sensors allowed the development of TTL exposure metering . SBC sensors respond quickly enough to evaluate flash intensity and can measure very small amounts of light. Selenium meters have not disappeared entirely as they are the only type not requiring a battery.
Meter types
Mechanical scale
Mechanical scale (analog) meters usually have a large and distinctive circular scale, however some have a linear scale. This scale must first be aligned to the measured illuminance, but then the entire range of exposure settings can be read off.
The meter display can be the classic moving pointer, which may have a follow pointer to align the exposure scale. Null or zero pointer meters are aligned to a central "null" position (e.g. Gossen Profisix). A few electronic meters use an LED array for scale alignment.
Digital
Digital meters do not have any mechanical component and display exposure settings digitally. A computed exposure setting is displayed immediately, however only one setting can be shown at a time and up / down buttons are provided to scroll through the range of settings.
Many digital meters also display an analog like scale of the aperture setting to the nearest half stop.
Early exposure meters
Actinometers
|
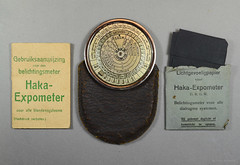
| Haka Expometer c.1910 image by Hans Kerensky (Image rights) |
Actinometers were the first exposure meters. They typically had the shape of a pocket watch and used light sensitive photo print paper as means of measuring. The time to darken a piece of such paper until it matches a standard tint is the input value for the scales on which an appropriate shutter-speed/aperture combination for the light situation can be found.
Extinction meters
|
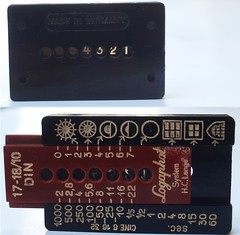
| Logaphot extinction meter of 1955 with slide-rule back to determine exposure settings for 100 ASA image by Uwe Kulick (Image rights) |
Another early meter, the extinction meter, depends on eyesight: the user looks through the meter at a row of numbers, each behind a celluloid window of different opacity, the highest or lowest visible number determining which light situation is given. Other extinction meters have a pattern visible through the eyepiece, and a control varies the amount of light allowed into the device until the pattern can only just be seen; the position on the control then indicates the exposure.
|
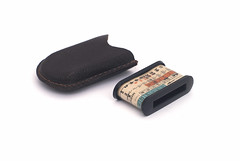
| Mimosa extinction meter of 1947 image by Steve Harwood (Image rights) |
Exposure meter makers
|
| Bertram Chrostar Exposure Meter image by Steve Harwood (Image rights) |
- AVO
- Ernst & Wilhelm Bertram (Bewi)
- General Electric
- Gossen
- Kobayashi Seiki (Kopil)
- Lux
- Minolta
- Samoca
- Sedic
- Sekonic
- Soligor
- Vibrator
- Vivitar
- Weigand Messtechnik
- Weston
- Zeiss Ikon
and many others; see Category: Meter makers.
Exposure meters in cameras
The first camera to include a built-in meter was the 1935 Zeiss Ikon Contaflex (TLR), using a selenium cell. To give sufficient sensitivity, a selenium cell requires a certain surface area (roughly postage-stamp sized). When covered with "insect eye" lenses to give directivity, they dominated the appearance of many mid-century cameras. In the early 1960s, makers of cameras and light meters adopted the battery-powered CdS photoresistor as a sensor element, which could be much more compact. Finally, gallium arsenide and silicon photodiodes were adopted, for their faster response rate.
The earliest built-in meters had no coupling to the camera's shutter or aperture settings. The photographer was expected to set both manually, based on the reading given. Later meters were "semi-coupled": meter readings were adjusted according to one of the camera's settings, and the readout indicated how the user should set the other. Finally, both aperture and shutter speed settings were coupled
Meter limitations and workarounds
A hand-held meter may be brought very close to a subject, or used to measure the light falling onto it, for a very accurate reading. A meter viewing light from the entire scene may give incorrect exposure, the most common problems being bright background behind the subject, such as a bright sky, or bright light reflecting off snow, sand, or water, leading to underexposure of the desired subject. Less commonly, dark backgrounds can also give incorrect readings.
Built-in meters may use a metering pattern strongly weighted towards the center of the frame (or even just a small spot). Camera makers have added increasingly complicated multi-zone metering, designed to identify typical "tricky light" situations and compensate accordingly.
For manual exposures, a solution is to walk closer to the main subject or zoom in with the lens, take a meter reading, and then recompose. The correct exposure value can also be read off a mid-toned 18-percent gray card held in front of the subject (or even the palm of the hand, then adjusting upwards by 1 stop). Like using an incident meter, this ensures that the light falling on the subject is measured, rather than the variable amounts reflected back towards the camera by a white wedding dress or a black cat.
Many advanced cameras with autoexposure offer of Auto Exposure Lock (AE Lock, Exposure Memory Lock, or EV Lock). Using AEL, it's possible to selectively take a meter reading of the desired area of the subject (for instance the bride's face). With that value now locked in, the complete scene can be photographed at the locked exposure.
As well, the technique of exposure bracketing can be used. Bracketing (Exposure & Exposure Bracketing) is the technique of taking multiple photos at different exposures to ensure at least one of them will be correctly exposed.
Professional Meters
Certain types of light meters are typical professional photographic tools:
Notes
- ↑ "Zone System" article at Wikipedia.
Links
- "Who Invented the Modern Exposure Meter?" by James Ollinger
- PDF of Light meter instruction manuals (various makes and models) www.orphancameras.com
- Sekonic Light Meter Manuals : Photo-Manuals.com
- James's Light Meter collection contains images, reviews and instructions for a large number of vintage meters.
- Anssi's collection