Difference between revisions of "Derby production codes"
(pics all CP -> CW pool; image-author template added although I'm not crazy about this "footnote" style attribution) |
(changed attribution formatting to better match others used in wiki) |
||
| Line 5: | Line 5: | ||
1) There is a recess in the lens thread that holds a flat tension spring. A number can be stamped, or more commonly, scratched into the lensbarrel underneath the spring. To make that accessible, you will need to unscrew the focus stop pin and then gradually unscrew the lens until the recess is exposed. There is no need to unscrew the lens in total ... but if you do, remember which way it came off as you will need to thread it back the same way for the focussing scale to be accurate. You easily can pop off the spring (it is loose, usually only held in place by a blob of dried up grease). When putting it back in, insert the sping into the recess and press it down with your thumb as you screw down the lens. | 1) There is a recess in the lens thread that holds a flat tension spring. A number can be stamped, or more commonly, scratched into the lensbarrel underneath the spring. To make that accessible, you will need to unscrew the focus stop pin and then gradually unscrew the lens until the recess is exposed. There is no need to unscrew the lens in total ... but if you do, remember which way it came off as you will need to thread it back the same way for the focussing scale to be accurate. You easily can pop off the spring (it is loose, usually only held in place by a blob of dried up grease). When putting it back in, insert the sping into the recess and press it down with your thumb as you screw down the lens. | ||
| − | {|class= | + | {|class=floatleft |
| − | || | + | | |
| − | | | + | {{Flickr_image |
| − | || | + | |image_source= http://www.flickr.com/photos/heritagefutures/4878272382/in/pool-camerawiki |
| + | |image= http://farm5.static.flickr.com/4140/4878272382_37d8eaeed7_m.jpg | ||
| + | |image_align= left | ||
| + | |image_text= Lens partially unscrewed to reveal recess <br/>and tension spring | ||
| + | |image_by= | ||
| + | |image_rights= | ||
| + | }} | ||
| + | | | ||
| + | {{Flickr_image | ||
| + | |image_source=http://www.flickr.com/photos/heritagefutures/4877664519/in/pool-camerawiki | ||
| + | |image= http://farm5.static.flickr.com/4098/4877664519_c9ff2fe164_m.jpg | ||
| + | |image_align= left | ||
| + | |image_text= Number stamped into the recess <br/>for the tension spring | ||
| + | |image_by= | ||
| + | |image_rights= | ||
| + | }} | ||
| + | | | ||
| + | {{Flickr_image | ||
| + | |image_source= http://www.flickr.com/photos/heritagefutures/4878284460/in/pool-camerawiki | ||
| + | |image= http://farm5.static.flickr.com/4082/4878284460_7ff7e20ce7_m.jpg | ||
| + | |image_align= | ||
| + | |image_text= number scratched into the recess<br/>for the tension spring | ||
| + | |image_by= | ||
| + | |image_rights= | ||
| + | }} | ||
| + | |- | ||
| + | |colspan=3 align=center | <small>images by {{image author|Dirk HR Spennemann}}</small> {{with permission}} | ||
|} | |} | ||
| + | |||
| + | {{br}} | ||
2) The second location where the number can be found is on the side of the lens mount. To make that accessible, you will need to unscrew the whole lens mount off the lens board (loosening the remaining two screws) and pop out the whole lens assembly. | 2) The second location where the number can be found is on the side of the lens mount. To make that accessible, you will need to unscrew the whole lens mount off the lens board (loosening the remaining two screws) and pop out the whole lens assembly. | ||
| − | {| | + | {{Flickr_image |
| − | + | |image_source= http://www.flickr.com/photos/heritagefutures/4877665467/in/pool-camerawiki | |
| − | | | + | |image= http://farm5.static.flickr.com/4097/4877665467_963f2f7dd0_m.jpg |
| − | + | |image_align= left | |
| − | + | |image_text= Number scratched onto the side <br/>of the lens mount | |
| − | + | |image_by= Dirk HR Spennemann | |
| + | |image_rights= wp | ||
| + | }} | ||
Revision as of 17:50, 20 October 2011
While the later units of the Foth Derby cameras can be uniquely identified by the serial number of their lenses, the early units do not carry any serial numbers. Careful inspection will reveal the presence of manufacturing codes, most likely representing the staff codes of the individuals who machined and assembled the lenses and camera bodies.
The manufacturing codes usually occur on two locations of the lens and they are generally the same.
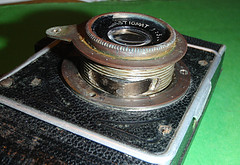
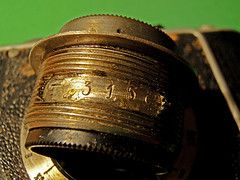
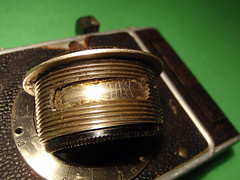
1) There is a recess in the lens thread that holds a flat tension spring. A number can be stamped, or more commonly, scratched into the lensbarrel underneath the spring. To make that accessible, you will need to unscrew the focus stop pin and then gradually unscrew the lens until the recess is exposed. There is no need to unscrew the lens in total ... but if you do, remember which way it came off as you will need to thread it back the same way for the focussing scale to be accurate. You easily can pop off the spring (it is loose, usually only held in place by a blob of dried up grease). When putting it back in, insert the sping into the recess and press it down with your thumb as you screw down the lens.
|
|
| ||||||
| images by Dirk HR Spennemann (Image rights) | ||||||||
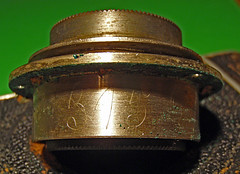
2) The second location where the number can be found is on the side of the lens mount. To make that accessible, you will need to unscrew the whole lens mount off the lens board (loosening the remaining two screws) and pop out the whole lens assembly.

|
| Number scratched onto the side of the lens mount image by Dirk HR Spennemann (Image rights) |


