Difference between revisions of "Red eye"
m (sep. LED) |
(minor rewording) |
||
| Line 11: | Line 11: | ||
Red eye can be reduced by several methods: | Red eye can be reduced by several methods: | ||
* Add one or more flashes shortly before the main flash and exposure; this causes eyes to close their irises, reducing the chance for reflection. Many compact cameras with built-in flash can do this, set as a "red eye reduction mode" - sometimes indicated by a crossed-out eye icon. On a few cameras, this is done by a separate [[LED]] instead of the main flash. | * Add one or more flashes shortly before the main flash and exposure; this causes eyes to close their irises, reducing the chance for reflection. Many compact cameras with built-in flash can do this, set as a "red eye reduction mode" - sometimes indicated by a crossed-out eye icon. On a few cameras, this is done by a separate [[LED]] instead of the main flash. | ||
| − | * Move the flash further away; with a separate gun, this can be done by holding the flash by hand or with a flash extension bar - using an extension cable from PC socket or [[hot shoe]] if necessary. With flashcubes, this could be done with a flashcube extender | + | * Move the flash further away from the lens; with a separate gun, this can be done by holding the flash by hand or with a flash extension bar - using an extension cable from PC socket or [[hot shoe]] if necessary. With flashcubes, this could be done with a flashcube extender |
| − | * Bounce the flash off of the ceiling, if indoors. This is not usually possible with built-in flashes, but many flashguns are fitted with pivoting heads for this purpose - and others could be held by hand to point upwards. This spreads and diffuses the flash, improving the lighting generally, as well as changing the angle to reduce red eye, but can result in strange colour casts if the ceiling is not white. | + | * Bounce the flash off of the ceiling, if indoors. This is not usually possible with built-in flashes, but many flashguns are fitted with pivoting heads for this purpose - and others could be held by hand to point upwards. This spreads and diffuses the flash, improving the lighting generally, as well as changing the angle to reduce red eye, but can result in strange colour casts if the ceiling is not white, and considerably reduces the power (and so range) of the flash. |
| − | * Post-process or retouch the image. Some digital cameras can do this automatically, immediately after the shot, and some photo processing software has it as an automatic function - but it can be done by simply filling in pupils with black dots "by hand". Traditional paper prints were sometimes retouched using black ink to do the same thing. The only disadvantage of this (apart from the effort of doing it) is that irises are often invisible since they were wide open when the picture was taken, so eyes | + | * Post-process or retouch the image. Some digital cameras can do this automatically, immediately after the shot, and some photo processing software has it as an automatic function - but it can be done by simply filling in pupils with black dots "by hand". Traditional paper prints were sometimes retouched using black ink to do the same thing. The only disadvantage of this (apart from the effort of doing it) is that irises are often invisible since they were wide open when the picture was taken, so eyes had already lost their colour. |
Revision as of 01:10, 13 September 2008
Glossary Terms
Red eye is an unwanted effect caused by using a flash close to the lens, where human eyes have red-filled pupils (and animal eyes sometimes have other colours). This comes from the flash reflecting back from the eye's retina. This is common with compact cameras, where the built-in flash (or flashcube socket) is fixed close to the lens.
Prevention
|
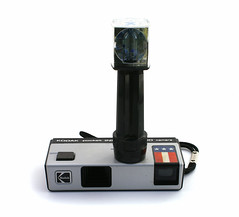
| Pocket Instamatic 10, with Magicube extender, to reduce red eye. |
Red eye can be reduced by several methods:
- Add one or more flashes shortly before the main flash and exposure; this causes eyes to close their irises, reducing the chance for reflection. Many compact cameras with built-in flash can do this, set as a "red eye reduction mode" - sometimes indicated by a crossed-out eye icon. On a few cameras, this is done by a separate LED instead of the main flash.
- Move the flash further away from the lens; with a separate gun, this can be done by holding the flash by hand or with a flash extension bar - using an extension cable from PC socket or hot shoe if necessary. With flashcubes, this could be done with a flashcube extender
- Bounce the flash off of the ceiling, if indoors. This is not usually possible with built-in flashes, but many flashguns are fitted with pivoting heads for this purpose - and others could be held by hand to point upwards. This spreads and diffuses the flash, improving the lighting generally, as well as changing the angle to reduce red eye, but can result in strange colour casts if the ceiling is not white, and considerably reduces the power (and so range) of the flash.
- Post-process or retouch the image. Some digital cameras can do this automatically, immediately after the shot, and some photo processing software has it as an automatic function - but it can be done by simply filling in pupils with black dots "by hand". Traditional paper prints were sometimes retouched using black ink to do the same thing. The only disadvantage of this (apart from the effort of doing it) is that irises are often invisible since they were wide open when the picture was taken, so eyes had already lost their colour.