Optima-Rapid 500 V
Agfa Rapid 500 V
|
| Place holder Optima Rapid 250 image by photog 70 (Image rights) |
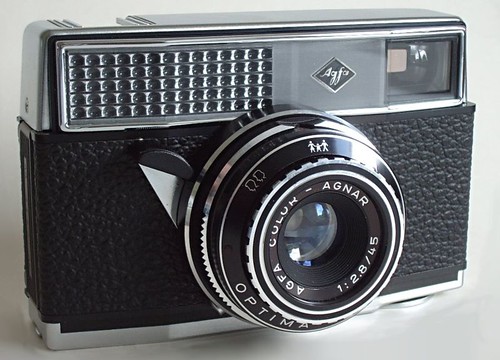
The Agfa Optima Rapid 500V is German made 35mm camera utilizing the Agfa Rapid 35mm film cartridges, it is part of the Agfa Optima series of Agfa cameras from the latter 1960s. The Optima Rapid 500V camera is an automatic exposure camera, with a selenium cell exposure meter coupled to the aperture and film cartridge ASA sensing tab. It also has a flash mode, and can be operated as manual aperture camera at shutter speed B. The camera has the same boxy form as the Iso- cameras, but is a slightly larger, the same size as the Agfa Optima 125C. It is also heavier than the Agfa Iso-Rapid C cameras, having more metal parts, a film advance lever, and a better lens. The lens is a F2.8 /35mm Paratic V with a self timer.
Overview
The camera body of the Optima 500V is still made of similar black plastic as used in the ISO cameras, but the top cover pieces, shutter button, side covers, front chromed surround, and film door are made from metal. The 500V, like the Optima 125C has the film advance lever on the bottom of the camera, left side, and is designed to be operated by the left hand, vs the right handed thumb-wheel of the ISO cameras. The film counter is on the bottom of the camera also. The top of the camera has only the shutter button, and a true flash hot shoe. The Shutter button like that on the Optima 125c has a threaded hole for a ca cable release, but the hole offset to the left side of the shutter button. The viewfinder is in the same location as on the Iso- cameras, but has glass lenses and has etched frame guidelines. On the right side of the viewfinder when looking through the viewfinder, a red dot can be seen with sufficient ambient light. This dot changes to green when the camera is in Auto mode ("A"), there is sufficient light for an exposure, and the shutter button is partially depressed.
This camera is designed to work with self powered flash units and thus does not have a battery compartment. Triggering the shutter closes a set of contacts in the lens, which trigger the flash to fire.
These cameras have a serial number on the left edge of the camera, next to the film door hinge. The serial number is in the form of " AG 68 25 AM".
Details of operation
The back of the camera is opened the same way the Iso- cameras are, by sliding the small silver triangle latch on the right side downward, and the back swings open to the left. The inside visually looks similar to the inside of the ISO cameras, but it is different, specifically because the film moves from the "new or full" cartridge which is in the left side of the camera, right to the "empty" cartridge on the right side of the camera. This is the reverse direction of the Iso- cameras and is likely due to the positioning of the film advance lever on the bottom left side of the camera. The full and empty Rapid film cartridges are held in place by spring fingers similar to other Rapid film cameras. The all metal back of the camera has spring fingers or plates to hold each cartridge more firmly in place, and there is a large film backing plate.
The ASA tab of the Rapid film cartridge pushes down on the center tab between the cartridge spring fingers of the left side of the rear interior of the camera. This center tab mechanically senses the length of the tab, and thus the ASA of the cassette, e.g. the film. This tab interacts with the metering system to adjust the aperture of the lens based on the film speed and available light. Similar to the ISO cameras, there is a rear door sensing tab and a film sensing tab. These are in different locations from the ISO cameras. The rear door open/closed sensing tab (silver) is in the bottom rear door channel of the camera slightly to the right or center. The film sensing tab is also silver and located just below the lower film drive gear, and senses when film is present in the camera.
With no film in the camera and the rear door open the film advance lever operates freely without stopping, turning the film drive gears. The camera shutter does not work. The film counter remains on "A". This mode of operation does not change if you depress the film sensing tab. With no film in the camera and the rear door closed,the film advance lever operates freely without stopping, turning the film drive gears. The camera shutter does not work. The film counter remains on "A". With film in the camera, the film advance lever advances 3 full strokes and then stops. The film counter will be on 16. The camera is ready to take a picture. If the shutter is triggered, a picture is taken and then the film advance lever advances the film one frame and stops until the next picture is taken. The camera then operates normally taking pictures at each frame. When the #1 picture (the last frame) has been taken the film advance lever operates without stopping and the shutter button does not work. Several strokes are required to advance the film to its end, and the film counter displays "E". The camera then operates like a camera with no film, as noted above. The back can be opened and the exposed film cassette can be removed, the empty film cassette can be moved from the left to the right position, and a new loaded film cassette can be placed into the left location.
The smaller forward ring of the Paratic V lens is the focus ring of the lens. A black triangle at the top aligns with three symbols for portrait (two poeple together), group (3 full size people), and landscape (mountains) distances. On the underside of the lens is another black triangle which corresponds to distances in meters (black lettering) and feet (green lettering). There are detents at the symbol distances which equal about 1.75m for portrait, 4m for group, and infinity for landscape.
The lens of the Optima 500 V has a silver metal ring at the base of the lens next to the camera body. This silver ring rotates to several positions for Auto, flash, or manual aperture mode. At the top of the lens (12 o'clock) is a red line, which the red "A" aligns with, when the lens is in auto mode. In this mode the camera determines the correct aperture to use based on the available light as measured by the selenium cell meter and the speed of the film. The shutter speed is unknown (it maybe 1/70th of a second, the same as the earlier Isomat Rapid camera).
At approximately 4 o'clock (looking at the front of the camera) there is a black line, which the flash aperture settings align to, indicating that the camera is in flash mode. For operation with a flash, the aperture must be set for the subject distance vs flash guide number.
At approximately 8 o'clock there is a green line which corresponds to the manual aperture settings for the B shutter speed. When the shutter button is pressed and held down, the lens shutter opens and stays open as long as the shutter button is held down. You can see the aperture through the front of the lens and this is useful to see if the aperture leafs are working correctly.
Disassembly notes
The front chrome metal rim of the camera must be removed first, and can be removed by undoing 4 black flat head slot drive screws which can be seen in each outer corner on the inside of the camera. The front clear plastic cover and aluminum label plate fall out when the front metal rim is removed. The top cover plate is then easily removed by removing the two Phillips head screws visible on the left and right sides of the Black metal top piece.
IN WORK "The single black flat head slot drive screw holding the selenium cell to the front of the camera must be removed and the selenium moved aside slightly along with the yellow wire that is in place on the top side of the camera can be un-done slightly to allow the viewfinder assembly to be slid upward. The viewfinder assembly top sheet metal cover can be carefully undone by lifting the two locking tabs at the narrow part of the assembly and gently prying the cover upward. Then the three viewfinder lenses can be cleaned.
Operation of the galvanometer needle can be seen from the exposed top of the camera by holding the camera selenium cell up to a bright light. The needle should move from its rest on the left, toward the right with increasing light."
Reassembly of the top of the camera is just the reverse of the disassembly operations.
The bottom cover is more difficult to remove, as the film advance lever must first be removed. It has a center "screw" similar to those seen on the top film advance levers of 35mm rangefinder and SLR cameras. This screw has 2 pin dimples for a pin type wrench. It is not clear which direction this center plate turns to loosen. Logically it would be a left hand tightening thread, so that advancing the film would also tend to tighten the screw. BUT THIS IS NOT CONFIRMED!, so be gentle if you attempt to remove the film advance lever retaining screw. Too much force in the wrong direction could shear off the brass threads of the screw. After the film advance lever is removed three Phillips pan head wood type screws can be removed and the plastic bottom cover should come off. (haven't done that yet).
The film door latch and its cover plate would seem to be held in place by the bottom cover, as there are no screws holding the cover plate to the camera body as used on the Iso- type cameras.
The lens has no visible screws on its exterior to indicate how it is disassembled. flashcube mount or battery. NOTE: the rectangular front metal body ring and front body parts must be removed first to remove the lens.